头部欢迎
- Welcome to Weihai CRONY Fishing Tackle Co., Ltd!


头部快捷导航
About us | FAQ | Contact us
Hot Search:
Fly fishing General fishing


FAQ
|
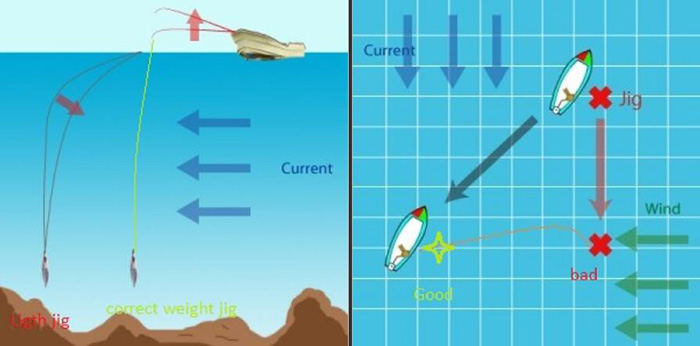
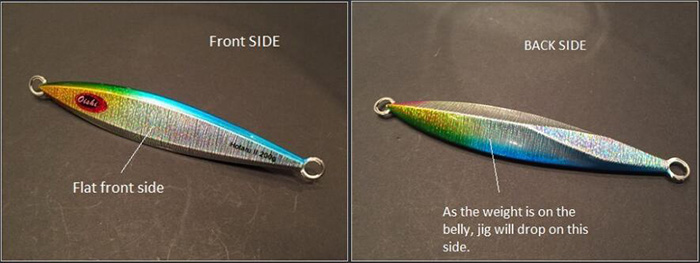
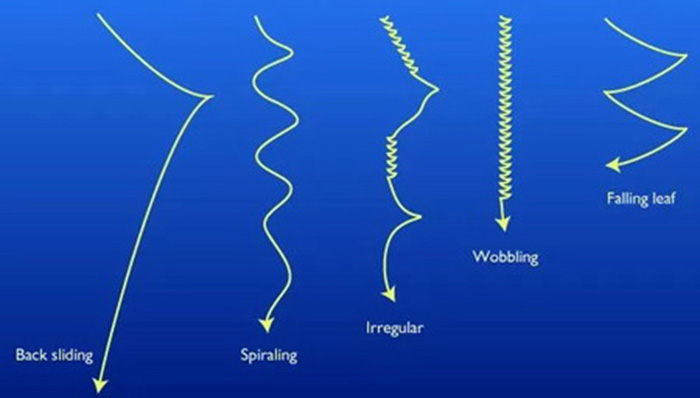
SLOW Jigging technics Origin While Nirohiro SATO was landing his college fish, he had left his jigging rod in the rod holder with the jig close to the bottom. Returning to his position, he pulled his rod and saw that a fish was at the end of the line. The sea was a little agitated, the movement of the boat was enough to animate the jig, attracting a fish to his lure. Subsequently, the idea came to fish in this way, leaving the lure close to the sea floor and animate it with small jerk. It's only a few years later SLOW jigging was born. SLOW jigs are usually made with one heavier side and one flat side, creating a jig with flat fall erratic sliding and wobbling motions. Two words define SLOW jigging "LIGTH & SLOW", fishing with light equipment, requiring less physical effort. The jigs are usually rigged with two sets of hooks, one set at the head and another one on the tail, allowing fishermem to catch fish during jig drop and ascent . Generally, we will use jigs with 60 to 400 grams weight depending of the water current and depth. The high speed retrieve is replaced per graceful and slower movements. Catching fish with the natural motion of the jigs and not per forced and tiresome motion. Unlike "Speed jigging" where jig falls in a straight line, slow jig will fluttering all way down, increasing your chances of catch fish. The goal behind slow jigging technique is catching fish close to the bottom without too much animation, attract all kind of fish, bring lure directly to the fishes, having something really attractive for low activity period. Also, give chance to slower species to grab the lures. But, I think the most important it doesn't require lot of physical effort as Speed jigging and you have same or better result. Keep contact with the jig is the key in Slow jigging. If you lose contact, you never know when you gone reached the bottom or if a fish bited. So, if you see your line taking a horizontal path, that simply means current is too strong or your jig is too light. Bring everything up and exchange for an heavier jig. Sometime when current is too strong, you need to cast in front of the current to let the jig fall straight to your fishing area. If the boat is equipped with a sea anchors, it's very helpful.
|
|
|
|
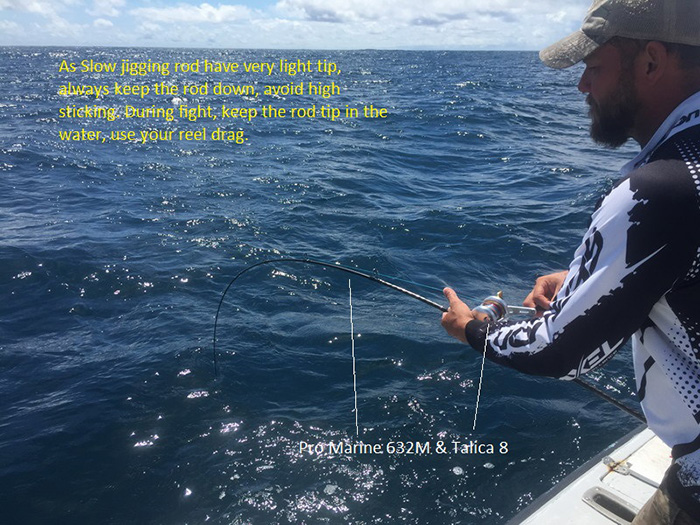
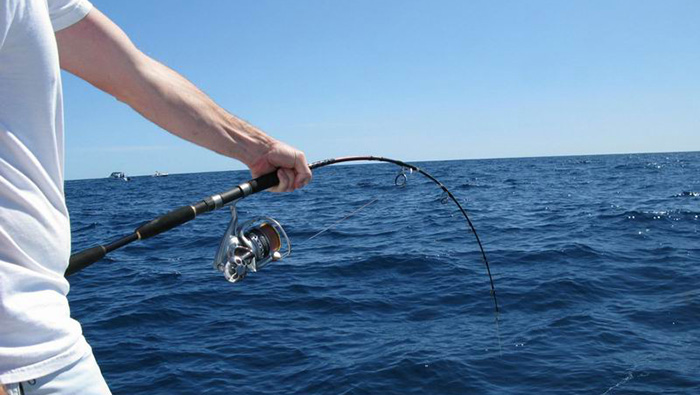
Rod Usually Slow jigging rod is longer than speed jigging rod (approximatively 6 to 7.5 feets long), having a thinner blanks, super parabolic action, fine and soft tip action. however, this rod will have good backbone close to reel support section. The soft tip will be use to bounce the jig, on each reel crank or rod pull, the rod tip will transfer the energy on the jig like a catapult. Jig will come up straight and will fall like a leaf with sliding or wobbling action. As slow jigging rod has no powerful blanks, you will really not fight the fish with the rod, rather you will use the power of the reel. During big fight, rod tip is almost under water, otherwise you will have some trouble to bring back your trophy. If we compare the situation to a clock hand, fight will be between 06:00 and 09:00. During our tests, Amazing II serie slow rod did a great job, low price, good quality, good value. As the reel and fishing line are really the key, you're better invest your money into a good reel and quality fishing line.
|
|
|
|
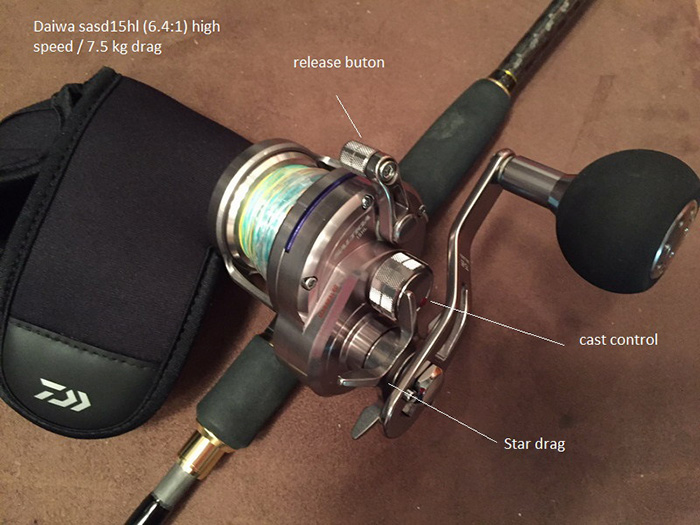
Reel Using quality reel is mandatory in slow jigging, always try to use lighter weight reel with good retrieve speed and large line capacity. As “slow rod” has no enough power to fight or pull back large fish, the reel will support all the effort. High speed ratio (5.8:1 to 6.4:1) is require, if you want generate enough tip action to create enough lure bouncing, usually each reel crank will recuperate 80 to 110 cm of line. 300 to 400 meters of PE2-3 is perfect, usually 8-12 lb reel drag is enough, because slow jigging hooks are light and we don’t want them opened. A good reel drag is a "MUST "specially if sea floor is full of obstruction. Three reels has been tested, Daiwa Saltiga star drag, Shimano Ocea 20000, Shimano Talica 8, both of them are good.
|
|
|
|
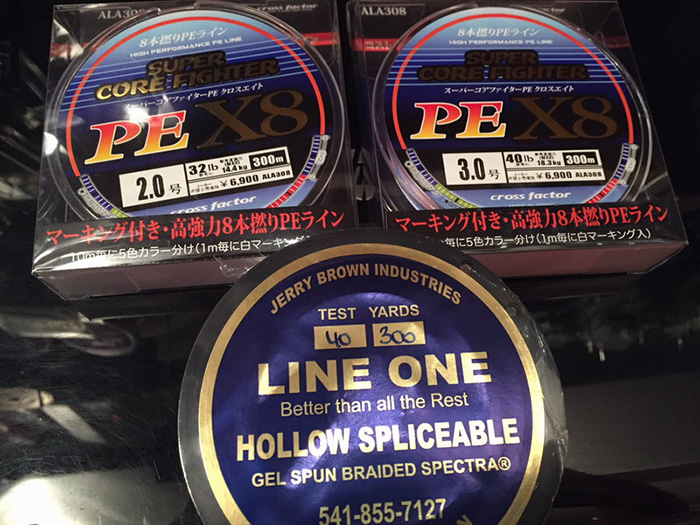
Line (Braided only) We use 8 strand braided line, it must be thin for the following reasons: we want a good drop speed with minimum of friction reducing "Drag" effect, having more line capacity inside the reel and finally to have more sensibility. Thinner is your line, more jig control you will have. I loved PE X8 braided line from "Cross Factor", it’s a solid core, super thin, Japanese quality strand with a round shape, line color change every ten meters, with a white marker every meter and black marker every five meters. Very helpful to locate depth and detect if you are close to the bottom. Another good breaded line, it’s the "Jerry Brown Decade" 40 lbs, bit ticker but it’s a hollow core braided, very strong, but expensive. I recommended PE 1.5 to PE3 line size (20 to 40lb). Like speed jigging, you need to use 10-15 feet of clear leader, thin fluorocarbon leader is the best.
|
|
|
|
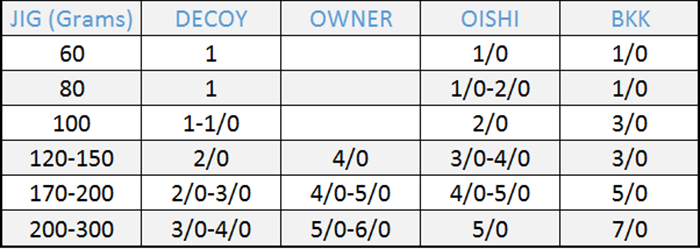
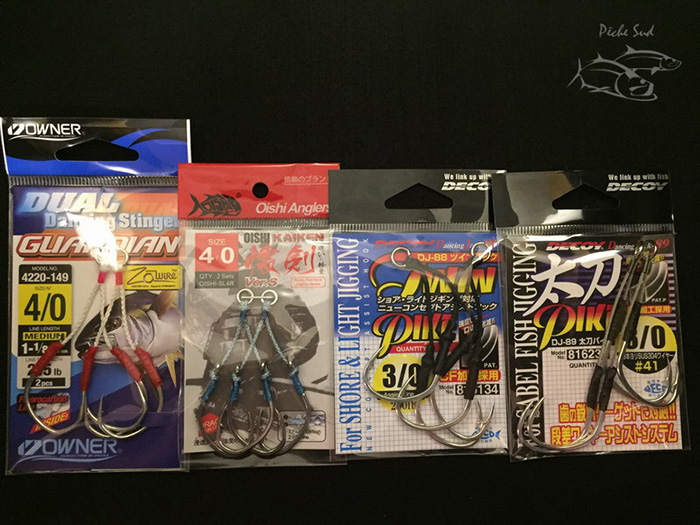
Slow jigging hooks Slow jigging hooks are bit different than speed jigging hooks, they are fine and very sharp. When I say "Sharp", I mean the hook point grips into your skin when you touch it. The length of the assist cord can be long or short, just avoid getting hooks tangled. Hooks size are generaly smaller than those used for speed jigging, commom size is between 1/0 to 6/0. As the jig is often attacked during the descent, adding hooks at the jig's tail is a good thing, except if sea bottom is too crowded. During our last fishing trip, we just put two hooks on the jig head, as slow jigging hooks are so sharp, it's not uncommon to hang fish by the head, side, belly. Owner Guardian hooks and Oishi hooks have both closed bends, allowing better penetration into fish jaws and reduced stalls. Note on the picture how the hooks point is oriented towards hook eyes. There's no specific hooks size to use with slow jig, just validate the head and tail hooks don't touch each other. Generally, here is what I recommend in terms of size, but this can vary depending on the jig's shape and how manufacturer made the hooks. The chart below is based on : DECOY JS-3, Owner Guardian, Oishi Kaiken, BKK 8070.
|
|
|
|
|
|
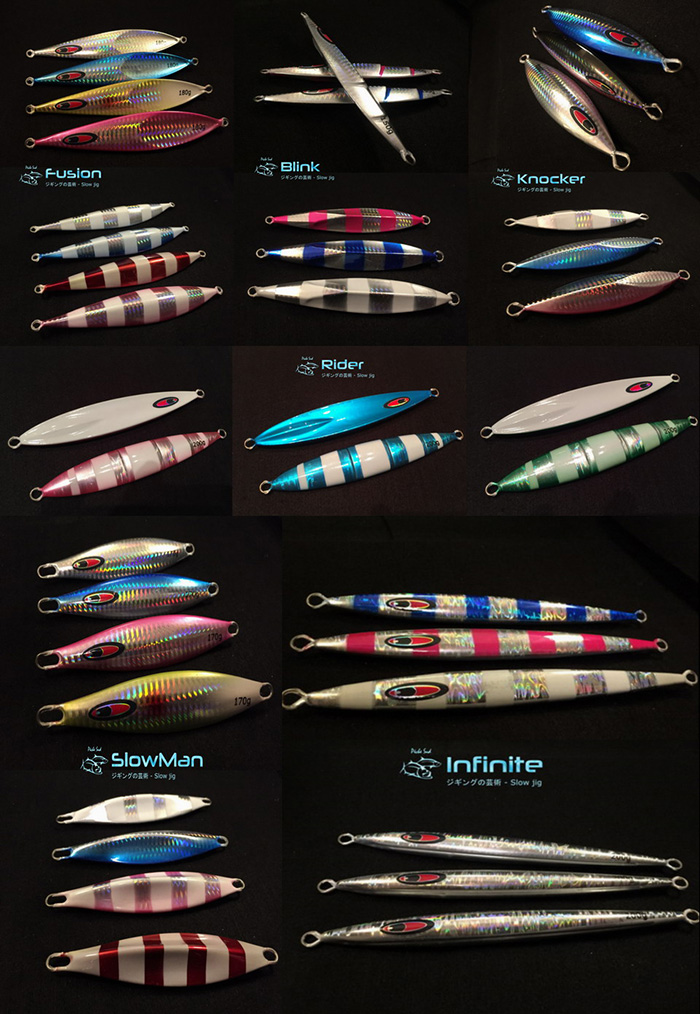
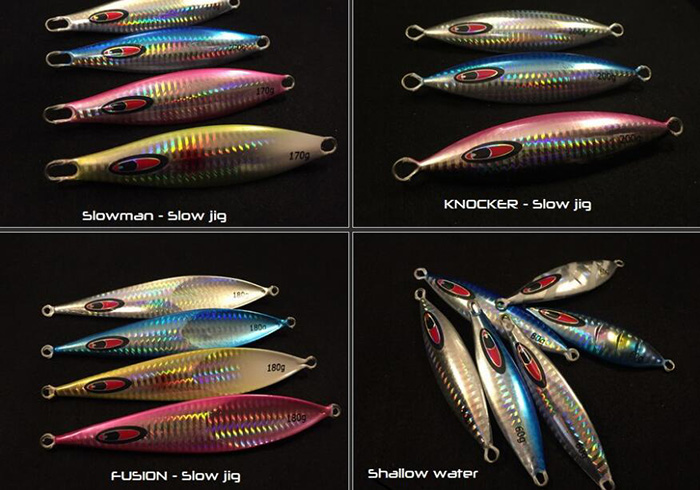
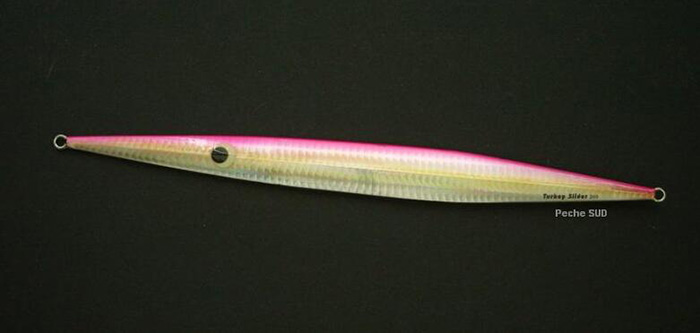
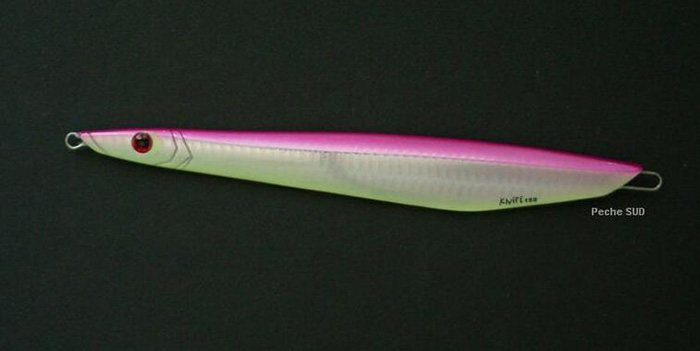
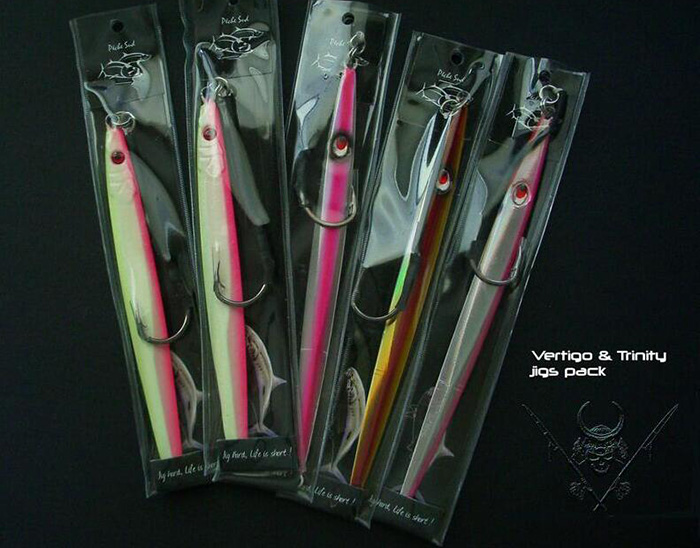
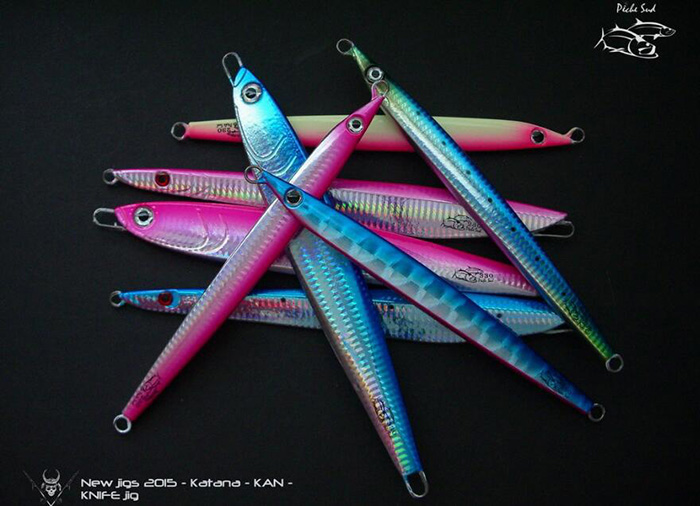
Jigs As Slow jig is a bit larger and fall flat, it has a tendency to DRAG during the drop, especially when current is strong and you need to go deep. Always keep line straigt is crucial, if you want feel the bite. So, it's very important to choose the correct jig weight and chose the thinner fishing line as possible. How to choose the right jig? that depends on targeted species, if the fish live close to the bottom (snappers, grouper), I will go with a woobling jig as "Slowman, Knocker, Fusion jigs", larger profil, slow drop. In contrary, if you target a fish who stay in the water column as Jacks, Tuna, amberjack, I will go with "sliding" model as Blink, Infinite, Rider jigs. Snappers or groupers are territorial fishes they will stay close to a structure, so they will not chase the jig as amberjacks, usually they will take the jig close to the bottom (1 to 10 meters). Also, you need to work your jig with very slow and give them more time. In a big school of snappers, first, you will feel smaller fishe's attack the jig, only after few second the big one will come. (Survival skills) In contrary, tunas, amberjacks, jacks, bonito will prefer jigs with "sliding" or "erratic" action. As they hunt vertically, fast animated jig will be much more successful. About colors, I think color is really not a matter, usually blue, pink, silver color is the BEST. What jig weight will be the best? usually 150 to 200 grams jig is the good choice for (40 to 100 meter) depth. Between 10-30 meter, you can use 80-100 grams jigs, always try to go for the lighter weigth. I personnaly used 150-200 grams jig for the most situation, the only time I need to go with heavy jig as 240 grams, it's when I target deep species over 120 meters or current is too strong.
|
|
Rig Always remember slow jigging hooks must be placed above the jig and not below. Otherwise you will hang in the sea floor. Normally, I recommend using only two hooks at the jig's head. With four hooks, you will catch more fish, but you will also hang the bottom. (Except if the sea floor is clean or soft) About rigs, you will need different size of solid split rings with you, depending of the target fish and jig size, you will need to match terminal size. You will also need a swivel or solid ring as anchor, because you can't attach directly the leader on the split ring or directly on the jig. |
|
Terminal gear as split rings, solid rings (Size #5,6,8) are required, also swivel, assist cord (20,30), crazy glue, blade. Using a small plastic box is very helpful. For myself, I use the same box for speed and slow jigging terminal.
Terminal tackle box for jigging
Leader We recommend to use at least 10 feet of 30-50lb fluocarbon or nylon leader. This length will allow you to bring the fish on board more easily, also the jig will appear completely free. You can use fluorocarbon if seafloor is very rocky or the water is very clear. Otherwise nylon leader does very well. I prefer thin leader size, otherwise it will deform the movement of the jig. To connect leader to the braid, I use an FG or PR Knot for a maximum strength.
Slow jgging motion High pitch: Let the jig falls to the bottom, then, raise it quickly by two three turns of crank, because we don't want to be hanged. Subsequently, it's like "speed jigging" movements in slow motion, slower pace, the jig fall one second between each crank.
Slow pitch: Keep the rod parallel to the water plan, load the rod by one reel crank (or less) and make small pause between each turn crank. The jig will move from vertical to horizon and so on. Since the reel retrieves nearly one meter per crank, the jig rises with a left / right movement. It can be simply waddled close to the bottom (1 meter), it is very effective on snappers, always try to follow the sea floor.
Long pitch / long fall: Pull the jig up by high sticking the rod in direction of the sky, as soon as the rod reaches its full height, quickly drop the rod tip to the water level. Then, let the jig fall, follow the fishing line movement, as soon line change direction, set the hook. Repeat this motion and add a reel turn to change the jig position in the water column. Be careful not tangle the line on the rod tip. We can also mix all his movements, use the one you like the most, the main thing is catching fish. |
|
Slow jigging in Fresh water Yes, Slow jigging is also very effective in freshwater during summer when fish stays under the thermocline. We did some tests on Champlain's lake trout and it works very well. When the water starts to warm up, trout stays under the thermocline, close to the bottom, concentrate at specific locations. At this moment, SLOW jigs become unbeatable. In terms of results, Mathieu and three friends made a hundred trouts in the same day, no trolling, it's about staying on top of the school and doing some intensive jigging. Best jigs weight is between 60 and 100gr in silver or blue color, a fine rigging is required, small size leader in Fluorocarbon 12-20 lbs. Summer lake trout fishing, how to do it? Use SLOW Jig lure Lake trout on Slow jig is the most efficient, effective and effortless way to catch lake trout during the summer months, no trolling, no downrigger, just locate the fishes and drop the jig. This technic is effective when trouts run down to the deeper part of the lake, usually they are grouped close to the bottom. Use a fish finder to locate the school, then drop a slow jig in front of them and let them come. Most of the fishermen use rubber jigs or bucktail jigs, but these kind of jigs will never beat the wobbling action of the slow jig. The slow jig look like a falling dead minnow, it flash and vibrate by itself. Usually, 60,80,100 grams jig is perfect in term of size and drop speed for Lake trout. First, you drop the jig to the bottom, when the jig reach the floor, hit the lake floor with the jig few time, it move up some mud and dust, creating a dusty cloud that will attract fishes. At the moment they see the jig coming out, they will instinctively bite. Use a long jerk and long fall jigging move. |
|
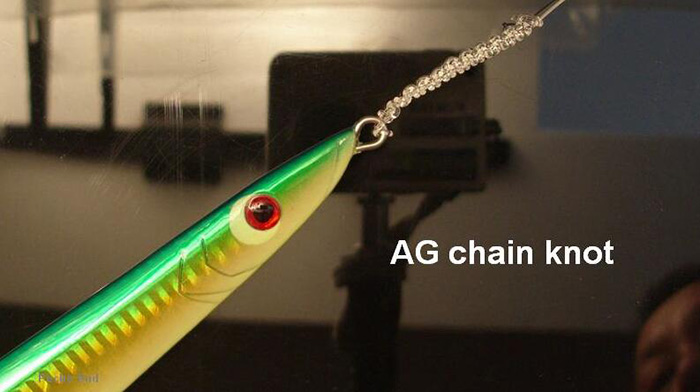
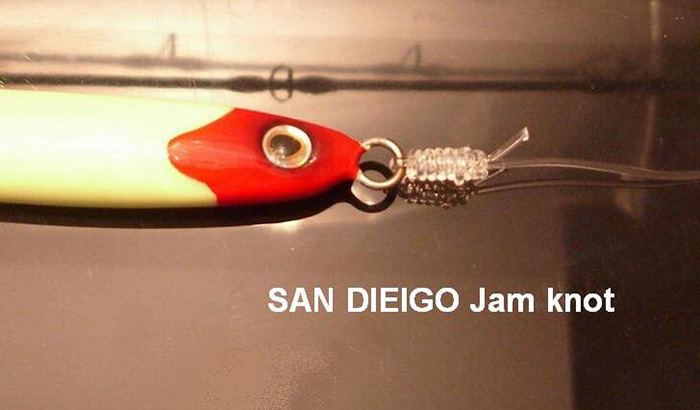
Knot to use Use a FG Knot to connect braided line to your leader and between your leader and jig, you can use a "UNI Knot", "AG chain knot" or "San Diego jam knot" |
|
|
|
SPEED Jigging technics
Origin
Jigging, speed jigging, deep sea jigging, butterfly jigging, vertical jigging, yoyo jigging are all names used for this fishing technic. Originated in Polynesia, it meet a phenomenal rise in Asia, Europe, Oceania, USA and now in Canada. This technique allows to catch the big fish vertically, normally reserved for anglers with heavy gear. Renewed in 1990 by a Japanese "Yoichi Mogi," he was the instigator of most new Jigging equipment (rods, reels, lures (JIG) and popularized the style of fishing "Japanese Jigging."
To explore the new fishing areas where other technique can not reach. Jigging aims to place the lure where the fish are located. The secret is to have a good fishing guide to maneuver the boat, placing the jig over the fish, for that you must calculate current strenght and wind, to allow sufficient time for the JIG to reach its target. Subsequently, the fisherman skill makes the difference.
How to jig
Basic jigging technique, let the lure (JIG) reach the bottom and back to the surface by varying the speed and motion, work the water column. In Mexico, all predators were between 80 and 130 meters deep, we let the jig reach the bottom and retreive one third of line, then drop down, then wind up and we restart this stratagem until the bite. With a longer rod handle, it's normally wedged under the arm or rested on a fighting belt (harness), we move the rod up and down, while retrieving line. The action generated by this movement ascend the jig by jerk and twitch while giving an illusion of life. The retrieve speed can be fast, slow or long stir. The Jigging is not relaxing, it requires physical exertion and require adapted equipment. |
|
Rod choice
A "jigging" rod is normally shorter, more flexible (with a parabolic action), more resistant and provide a longer handle, allowing you to fish without getting tired. These rods are designed for conventional and spinning reels. The choice of the rod is based on the following criteria: rod weight, max load, lures weight and rod's action. We looking for a balance between strength and flexibility of the rod blank, a harmony between the rod and the reel weight, nobody want to end up with a heavy steel bar or a light strand of spaghetti. Regular spinning rod or boat rod is not recommended because they are not made for vertical motion and you will regret your economical choice. The handle is often too short, the reel support is often misplaced, too stiff or too soft, it will be hard to animate properly the JIG. Certainly good jigging rods are more expensive, but they fill a real need and not just a whim. They are often manufactured in high quality composite, made for heavy use and strong torsion resistance caused by the large bottom fish, but remaining flexible and light. |
|
|
|
Reel
The reel should be strong with a good drag, otherwise you'll only fish once. We adjust the drag at 30% of the line strength, of course, reel drag adjustment will be adapted to the strength of the rod. Example: If you use 50 lb test braided line, the drag will be set at 15 lbs and the rod should bears at least 15 lb (LOAD). I insist on the reel strength, often fishes are generally bigger and stronger, but reeling all day, moving the rod up and down, the mechanism of the reel is under heavy pressure. We encourage you to use a real jigging reel. Also, when you spool a reel with braided line, be sure to put some pressure (5 lbs) during spooling process. Otherwise, line will dig inside the spool.
JIG lures
Saltwater jigging lures are made for vertical fishing in deeper part of the sea; where other technics are less productive. Usually the bigger fishes stay near the bottom during daytime, only way to catch them, it's presenting a lure directly to them. Pelagic fishes don't like light, prefer deeper area, with less light & heat, bottom fishing or jigging is the most productive technique for these large fishes.
Jigs are usually made with metal, weight between 100 to 300 grams. Mainly, there's two types of JIG on the market, "Center weight" or "tail weight". On "center weight", the weight is balance around the center of the jig, on the "tail weight" they are placed towards the tail. Center weight jig is mainly used for midwater fishes (30-70m), slow descent with sideways movements. Really deadly on Cudas, kingfish, sailfish.
The "Tail weight" jig is balanced with a weight near the tail. This jig is designed to reach bottom quickly and lift with a less action. These jigs are used for deeper fishes. They are more streamlined, thinner, provide less resistance in the current and require less effort to manipulation. |
|
|
|
|
|
Long or shorter jigs? your choice will depend on current's strength and the depth of your fishing area. Heavy lure will drop faster and will stay more vertical, for against, it will be harder to handle and require more effort. If it is too light, it will take more time to reach bottom and will have a open angle (current), but it will be less physical. The jig length will also affects the descent of the lure, for against, a big lure takes bigger fish. If you fish from 90 to 130 meters deep with a moderate current, a 150 to 250 grams jigs will be perfect. My favorite colors are pink / silver, green / gold, red / white fluorescent, Silver, Orange. Before buying a JIG, validate the "Lure weight" on your rod. |
|
|
|
|
|
A Good size selection of jig is mandatory to be ready for different weather situation. In Dec 2014, winds and currents are in opposite direction, all our 200 grams jig stay in my tackle box, they can stay in vertical position. Only 250, 300 grams jigs were good for this fishing week, so always try to have different size of jig. |
|
|
|
Hooks choice
Usually, stronger hooks will be used. As, we only target bigger fishes with speed jigging technic, hooks will also be chosen in proportion to the size of the jig, the gap should be a little wider than jig's width. Also want a curved point towards inside. Usually, sizes vary from 7/0 to 13/0 for the "speed jigging", smaller sizes(5/0 to 7/0) for slow jigging.
Jig of 150 grams - Hook 7/0 to 8/0
Jig of 200 grams - Hook 8/0 to 9/0
Jig of 230 grams - Hook 8/0 to 10/0
Jig of 250 grams - Hook 9/0 to 11/0
Jig of 300+ grams - Hook 10/0 to 13/0
I recommend BKK hooks, model 8090-6x-HG razor sharp is for speed jigging and model 8070-3x-hg for slow jigging. They made stronger with super sharped cutting pointe, can penetrate easly any fish jaws. They are solid, nice finish and saltwater resistant. Specially design for jigging. |
|
|
|
Line & leader
The braid line size depends on the rod strength (usually from 40 to 80 lb). We will often use PE terminolgy to indicate the braide line strength, calculate about 10 pounds per PE, such as: PE5 is about 50 lbs. We recommend 300-500 yards of line inside your reel. We also use a long leader (Approx. 15 feets length). The size of leader is based on fishes size and current strenght, usually we use 60-80 lbs leader is perfect. Bigger your leader is, more current will drag your line. Using fluorocarbon or nylon don't really make difference, except if sea floor is full of rock. So on a rocky area, go with fluorocarbon leader, otherwise Nylon leader will do the job.
There's new braid line on the market with color changes (every 10 meters), it becomes very convenient to locate depth (just need to count colors). Named "Hollow core braid", it appeared few years ago, stronger, thinner line, spliceable. Also, it's open new doors on how we connect a leader to braid line, pratically no knot required. The connection is 100% secure, based on "chinese finger trap" technique, leaders provide 100% strenght, you can even control the breaking points between your braided line and leader. No more big knot blocking inside your rod guides. Very usefull if you need to create loop to loop connection.
Require splicing needles and super glue. |
|
Advice
Lure weight Leader size
120-150 gr 40-60 lb (Fluorocarbon or nylon)
170-200 gr 50-80 lb (Fluorocarbon or nylon)
230-300 gr 100-130 lb (Nylon)
Rigs & knot
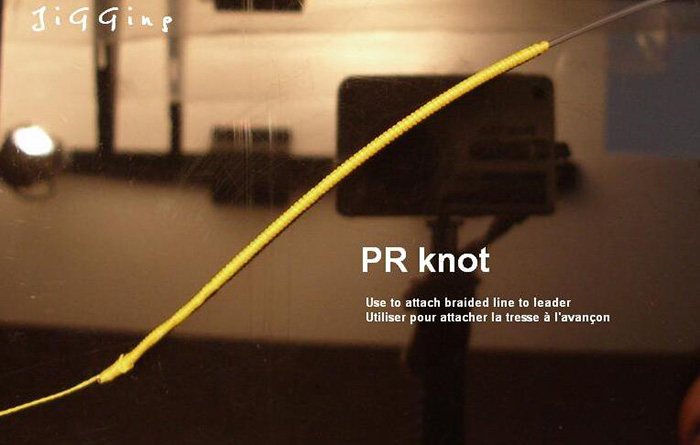
The braid is connected to leader by PR KNOT, this node is designed to pass through the rod guides with a minimum of friction. Avoiding ceramic rings breakage. It takes some skill to achieve this knot, but the result worth it. Requires a fly tying bobbin. Watch the video to see how to make it. Great for jigging, it's the best knot to use when you need to attach a long leader. |
|
|
|
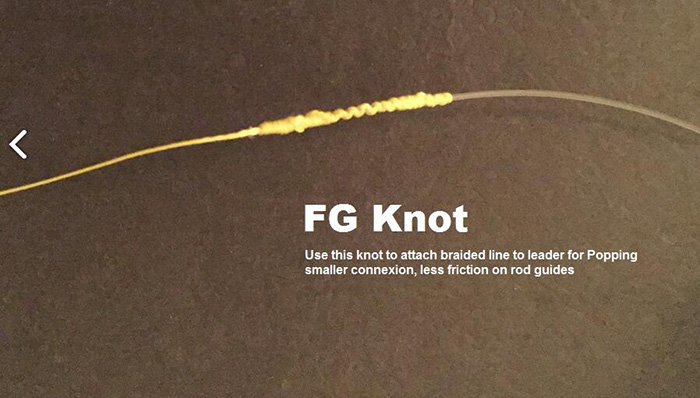
For Popping, it's possible to use a FG Knot", shorter length, less friction on the guides than PR Knot, also no tools required. |
|
|
|
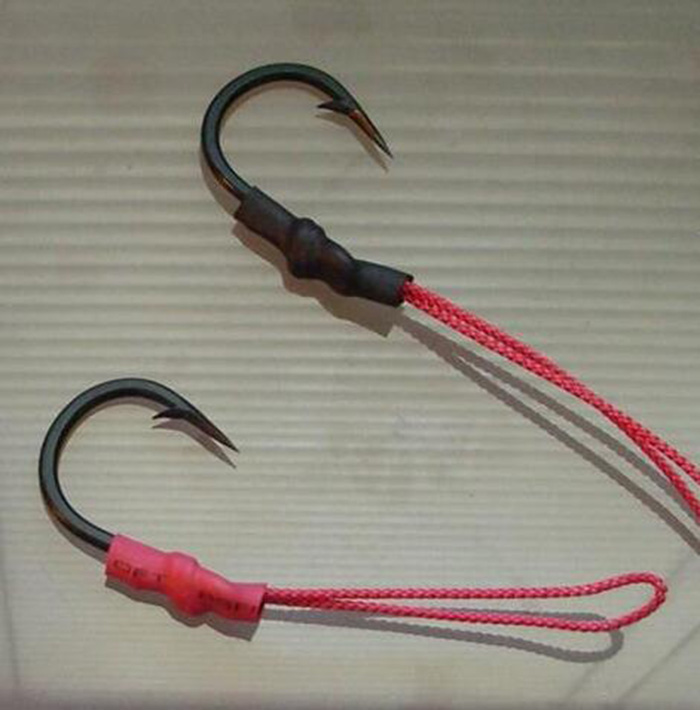
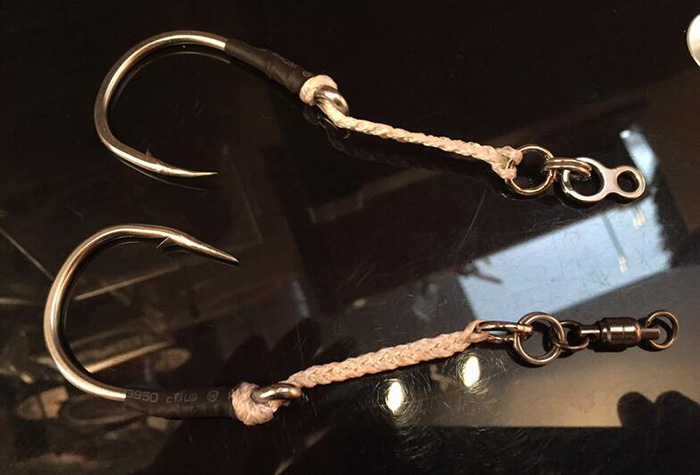
The hook with the small kevlar rope (1.5 to 3 inches long) is named "Assist hook." Normally one "Assist hook" is enough, but some fishermen prefer a double hooks (as example: 2 x # 5 / 0) to increase the catch ratio. Myself, I prefer a single big hook, size #7/0 to 11/0 and I make sure that hooks gap is larger than the widest part of the JIG. Usally, the assist hooks, Jig and leader are attached to a metal ring called "Ring Solid", serving as an anchor point. But, you can also use a swivel as an anchor point, as shown in the picture. That avoiding twisted lines. |
|
|
|
|
|
To attach the jig to leader, we use a node ? Improved trilene knot ? or San Diego Jam knot for big leader. For smaller leader, it's better to use a "AG Chain Knot", the stronger knot as i know. Fish bites are very obvious when you feel your jig slow down or become heavier, that mean Fish ON. Do not hesitate to set the hooks few time. |
|
|
|
|
|
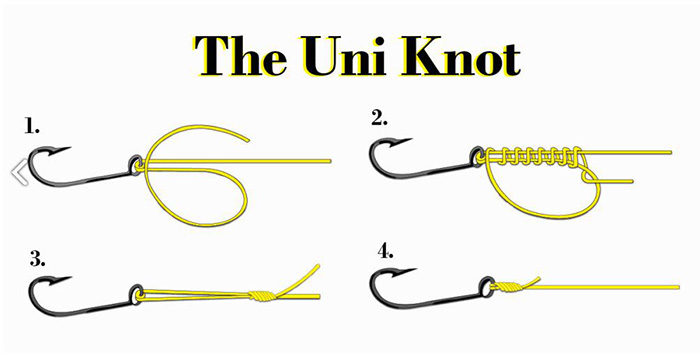
A simple knot to attach leader to hooks or to attach braided line inside reel spool, it's UNI KNOT |
|
|
|
Accessory
I strongly recommend you to use a fighting belt, if you do not want to have a back pain or bruise on your belly, pliers for split ring, knife, gloves to protect your hands (braid). Create your own PR knotter using a fly tying bobbin and empty flytying thread bobbin for PR knot (Add some weight inside the bobbin). |


Why should we use Fuji guides?
1.Fuji Guides fast heat-conductivity
2.High strength,durable
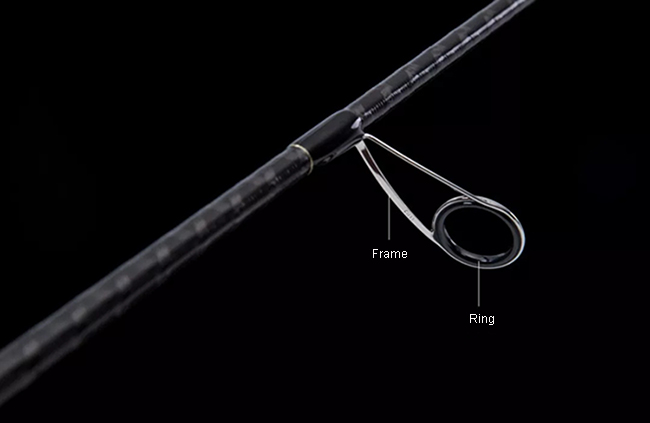
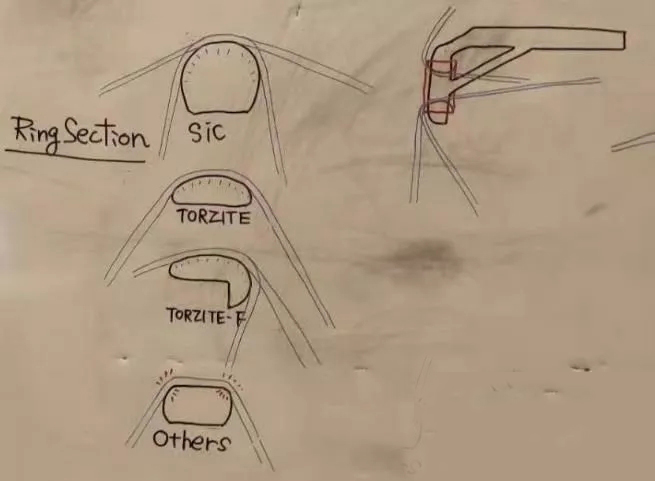
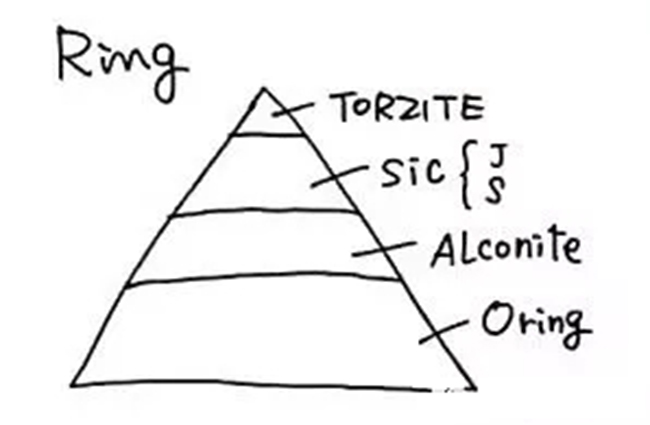
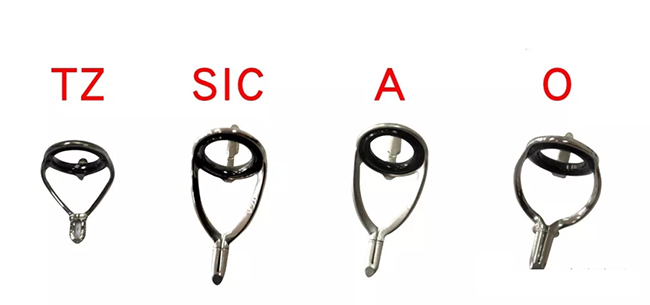
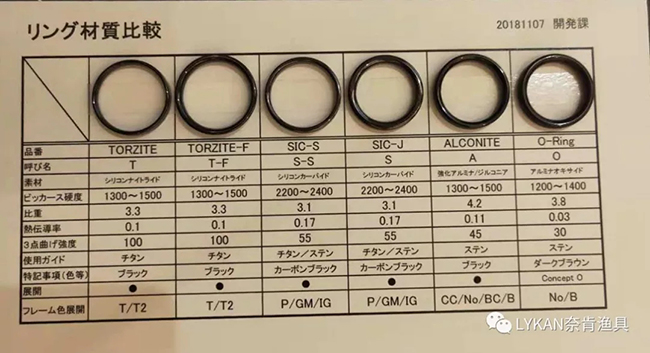
3.Type of guide ring
4.How to differentiate?
O:Dark Brown,Alconite:Black,SIC:Carbon Black,Torzite:Black.
All in all,thinner and brighter are better.
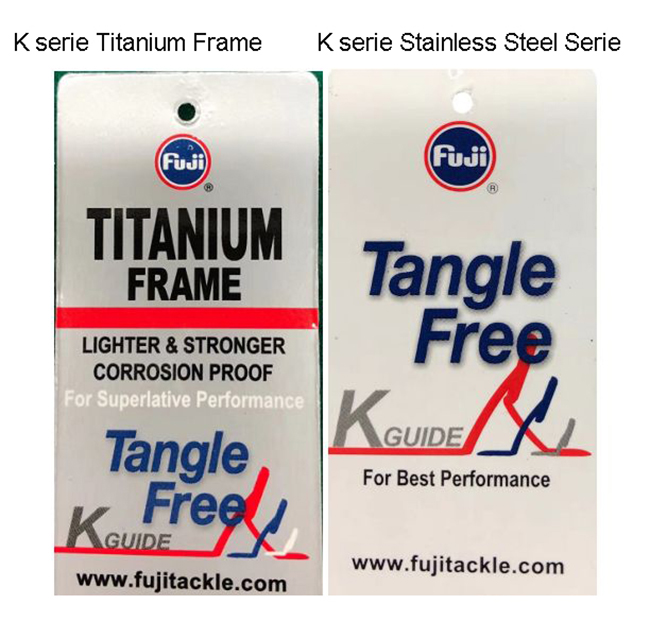
5.Different hang tag
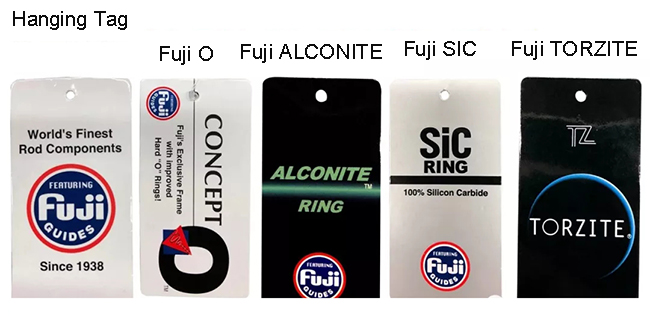
6.Appearance
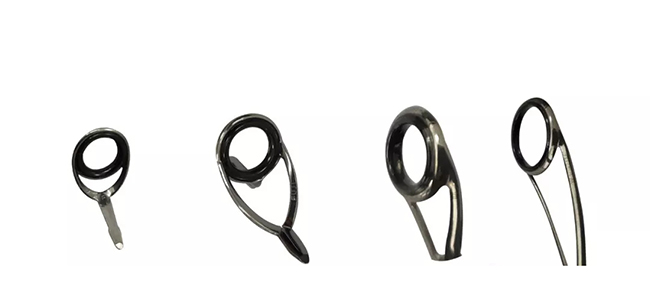
7.Performance and material difference
8.Frame material:stainless steel and titanium
9.According to shape profile:K and Non-K series


Drop-shotting is a versatile technique that can produce bass in almost any scenario in the Northeast.
BY GABE GRIES OCTOBER 29,2014
Every angler has a special “go-to” technique for bass, a particular method with which he or she is most comfortable and confident, a method that will always put a few bass in the boat, even when conditions are difficult. For some, this method is the Carolina rig; for others, it may be a jig-and-pig or a spinnerbait. For me, it is the drop-shot rig.
Drop-shotting is usually thought of as specialized for deepwater scenarios, a finesse technique using 4-inch skinny plastic worms that one would resort to only when faced with tough fishing. To the contrary, I consider drop-shotting to be a generalist technique: I can fish slow or fast, use a wide assortment of plastic baits, and catch bass at any water depth and in any type of habitat. Far from being a technique to catch just finicky, pressured bass, I think you can catch bass using a drop-shot rig anywhere in the Northeast.
The history of drop-shotting is muddled, with some claiming it originated on the East Coast, some saying California or Japan, and others claiming that saltwater anglers have been using this technique for decades. The drop-shot rig is nothing more than a line with a weight on the end and a hook tied to the line anywhere from 4 to 30 inches above the weight. While simple in nature, this rig allows you to detect even the lightest bites because, when you fish it properly, you will not feel the resistance of the weight, but only that of the hook and plastic bait.
Drop-Shot Tackle
Drop-shotting has soared in popularity in recent years, and specialty drop-shotting equipment – from rods to hooks to weights to plastic baits – abounds. While it helps to have some items specific to drop-shotting, in many cases using generalized equipment will get you similar results. To set yourself up to catch bass in Northeast (or anywhere else) with a drop-shot rig, you can spend a few dollars or a few hundred.
Weights

Specialty drop-shot weights are great, and they are offered in different shapes specific to the bottom type. A very nice feature of these specialty weights is the groove in the wire on top of the weight; tying your line to the weight using a simple overhand knot that is slipped into the groove allows you to easily adjust the distance between the plastic bait and weight. Additionally, if you get stuck, the line pulls off the weight easily so that you don’t lose the entire rig; you can put on a new weight instead of re-tying the whole setup. However, these weights are relatively expensive, depending on size and brand.
I go the cheaper route with drop-shot weights because I tend not to change the distance between bait and weight, usually relying on a plastic bait that is about 15 to 18 inches above the weight. I use “casting sinkers” made by Eagle Claw that are available at most sporting goods stores and are offered in lead-free versions. The cost is about $2 per bag, which contains from 6 to 10 weights depending on size. I use a 1/8-ounce weight when fishing in 15 feet of water or less, a 3/16, or ¼-ounce weight, in water from 16 to 25 feet, and a 3/8-ounce weight for anything deeper than 25 feet. I tie the end of the line to the sinker using a simple clinch knot.
Hooks
Hooks are not a place to skimp on cost; it is important to use a quality hook. I prefer Gamakatsu, but there are plenty of other manufacturers that make quality hooks. I tend to go a little smaller in hook size than some drop-shotters, preferring a size 1 or 2 octopus-style or split-shot/drop-shot hook. I have found bass rarely take these hooks deep into their mouths, and typically my hooksets are in the upper lip. There are other hooks specifically designed for drop-shotting, such as “StandOut” hooks, but in my experience these hooks are not necessary and seem to hook bass deeply.

Rods
Most fishermen use spinning rods when drop-shotting, but some will use casting rods. While you can spend hundreds of dollars on a specialty drop-shot rod, you can also use an all-around rod that you probably already own and still catch bass. For many years I used a 6-foot, 6-inch medium-power Berkley Cherrywood rod that I bought as a combo for $30. This rod served me very well until it broke. At that point, I decided to try a drop-shot rod. My current rod is a 6-foot 4-inch light-power fast-action All Star drop-shot rod. This is a great rod, although I do have to set my drag light and “baby” bigger fish a bit. The rod you buy will depend on your preferences in terms of cost and length, but a sensitive fast-action rod is best. More than likely, you already have a rod like this at home that can be used for drop-shotting.
Reels
When choosing a reel for drop-shotting, go with something light with a smooth drag. I currently use a relatively inexpensive Shimano Sienna 2500 FB. If you have a reel you like that has these qualities, give it a try before you purchase one specifically for drop-shotting. I like to keep my drag on the loose side. I know I have the drag set properly when I can hear the drag make a bit of noise while setting the hook.
Lines
I would suggest starting with the brand of fluorocarbon with which you are most comfortable. I use 8-pound-test Berkley Vanish fluorocarbon. To me, that test line is a nice compromise between line that is too light or too heavy. Some anglers drop to 6-pound-test in clear water or when fish are particularly finicky. Another alternative is to use a braided Spectra line or a “superline” like Berkley Fireline combined with a fluorocarbon leader attached via a barrel swivel. While I like the qualities of the fluorocarbon, I plan on experimenting more with Fireline next year. I would not suggest monofilament, as it is too stretchy and therefore does not have the sensitivity needed for this technique.
Plastic Baits

The selection of plastic baits for drop-shotting is endless. There are, of course, specialized drop-shot baits. Ones that I use in this category include a 4-inch Roboworm, Zoom Meatheads, and XPS drop-shot worms. However, I have found that just about any plastic bass bait works great on a drop-shot rig. I also like to use 4-inch twister-tail worms, lizards, Sweet Beavers, Paca Craws, 4-inch Senkos or similar stickbaits, and just about any other plastic in my tackle bag. I have found that the 3-inch Slug-Go is a great bait, especially on a larger river system such as the Connecticut or Merrimack. These baits not only catch bass, but also stay on the hook very well through multiple fish.
How to Hook the Bait
There are a few ways to place the plastic bait onto the hook. Some anglers slide the hook point into the middle of the head of the plastic bait, move the bait up about a ¼-inch, and then swing the hook up and out of the top of the plastic bait. I prefer to place the hook point below the plastic bait, about ¼-inch from the head of the plastic bait, and simply force the hook point straight up through the top of the plastic bait. In either case, make sure the plastic bait comes to rest at the middle of the bend of the hook. It is very important that the plastic bait stands out straight in the water so it will move with the slightest twitch of the rod or line. In some cases, anglers have good results by wacky-rigging a 4-inch worm or stickbait on a drop-shot rig.
How To Tie A Drop-Shot Rig
Use a Palomar knot to tie the hook to your line. Take the hook in your hand so the hook lies horizontally, the hook point toward the top. Run the line down through the eye of the hook, giving yourself extra line for the distance between the hook and weight. Run the end of the line back up through the hook eye until you have about a 2-inch loop below the hook eye, and then tie your Palomar, making sure that the knot is snug around the end of the hook eye and you’ve left the long tag end. Take the tag end of the line, pass it down and through the hook eye, and pull the end of the line tight. This will ensure that the hook stands out perpendicular from your line, which is the key to tying the drop-shot rig. Then, tie on your weight using a simple overhand or clinch knot. You may need to cut the end of the line to adjust the length between the plastic bait and weight. As I mentioned previously, I typically tie my rigs so the distance between hook and weight is 15 to 18 inches. With practice, you will get pretty quick at tying a drop-shot rig, but if you use a barrel swivel at the end of your line, you can tie up a bunch of rigs beforehand and simply tie them to the swivel when a replacement is needed. It is important to check the Palomar knot fairly often and to re-tie if the line gets frayed.
Where to Fish It
I can’t emphasize enough that drop-shotting is not just a finesse technique to be used in deep-water situations. I have caught bass throughout the Northeast with this technique in water depths from 2 to 50 feet and in habitat ranging from rocks to fallen trees to aquatic vegetation. In every situation, I have confidence in drop-shotting.

I cast the drop-shot rig to just about every place I would cast any other sub-surface plastic bait for bass. Obviously, it is difficult to fish this rig directly in aquatic vegetation or in wood. However, this technique excels when fishing the edges of aquatic vegetation, in open pockets within the vegetation, or at the edges of fallen trees or stumps. Fishing in these areas might require anglers to use stronger line and a medium-heavy-power rod so that hooked fish can be quickly pulled from potential snags. It is also possible to fish directly in aquatic vegetation and wood when using these “heavier” methods in conjunction with a heavier weight.
How To Fish It
If I am fishing in shallow water with obvious cover, such as aquatic vegetation, wood, docks, or rocks, I cast to the edge of the cover. If I am fishing in deeper water, I simply cast out from the boat approximately 30 to 50 feet. After casting, I let the weight settle to the bottom. It is important to be aware of how long it takes the weight to reach the bottom, as suspended bass will often hit the plastic bait on its descent. Once the weight reaches the bottom, I adjust the line so that I am just able to feel the weight. I very lightly jiggle the rod, a bit like you would when fishing a shakey-head jig, making sure not to pull the weight towards me. If I don’t get a bite, I let the rig settle and then slowly pull the rod tip up and towards me. Once I reach about 1 o’clock, I slowly lower the rod to about 3 o’clock, reeling down while I do so to keep the line tight. I then lightly shake the rod tip or let the line sit still for a few seconds. I repeat this until I lose confidence in the cast or the plastic bait is below the boat. I alternate my retrieve until I figure out what the fish want on that particular day. Some days a faster retrieve is best, while sometimes the fish want a slow retrieve or even a “dead stick” approach with almost no movement.

When anglers find bass congregated in deep water, they often drop the rig right below the boat, using the drop-shot as a purely vertical presentation. While this is a great way to fish under these conditions, I rarely use a drop-shot rig this way, instead using it as more of a search bait. You can cover a lot of water with it in a relatively short amount of time when you fish it as described above.
Regardless of how you fish the rig, the most important thing is to make sure you keep the line relatively tight at all times, as a bite can come at any moment. Bites can feel like a slight “tap-tap,” a lack of weight on the line, or a stronger pull as the fish may have simply picked up the bait and swam off with it. In the beginning, it can be difficult to detect some bites, and a rule that has served me well with this technique is that if something seems different, set the hook.
The drop-shot rig is the most important technique in my bass-fishing arsenal. It can increase your bass fishing success if you take the time to gain confidence in it. Remember, it can be fished fast or slow, at any water depth, in just about any type of habitat, and with a wide assortment of plastic baits. This technique catches bass anywhere in New England; from Candlewood Lake to the Quabbin Reservoir, from Lake Champlain to Lake Winnipesaukee, from the Connecticut River to Cobbossee Lake, and everywhere in between.
Gabe Gries is a fisheries biologist with the NH Fish and Game Department and is the state’s Warmwater Fish Project Leader. Bass are one of his favorite fish to pursue and the Connecticut River is his favorite fishery.

CONTACT INFORMATION
OFFICIAL ACCOUNTS
Official QR code


ONLINE MESSAGE